It was my second night at home with Gordon and I wanted to make a nice dinner. While food shopping, I realized that I need to coordinate ingredients so that half of the food I buy for the week will not go to waste. Or I need to make meals that I can use the leftovers for other things.
I decided to make a roast chicken with brown rice pilaf and maple glazed carrots. I have always liked the little roast chickens that you can buy in packs of two. However, sometimes they were so small that they barely fed the whole family. Now they are perfect!! Anyone can roast a chicken. Its pretty hard to mess up unless you fall asleep for the night and even then your meat may just turn to jerky!
I love to use fresh herbs and roasting a chicken stuffed with them is no exception. My mother has a ridiculously plentiful herb garden, but if you are not lucky enough to have that resource, you can buy several types of herbs and use them in several recipes throughout the week to cut the cost of only utilizing them in one dish. You can use any kinds you want. I usually tie a bunch up with some kitchen twine and throw it right inside. I also like to cut a lemon in half and put both pieces in the chicken cavity as well! The flavors and moisture that the lemon produces in the meat is wonderful! You can use the leftover meat to make chicken salad sandwiches or top a caesar salad with chunks for a nice lunch or dinner.
I am going to promote a rice cooker again! Get one!!! Last night, I steamed brown rice in chicken broth and steaned carrots at the same time with my veggie insert. I then seasoned the rice with almonds and soy butter and glazed the carrots with a touch of soy butter and maple syrup. Gordie could not get enough of it!!
Although freshly made anything is better then pre-made or boxed items, I have to say that the whole wheat version of stove top will give you your stuffing fix if need be before thanksgiving time!!
Tuesday, August 31, 2010
Thursday, August 26, 2010
Gordon's Pirate Cake
This was by far the most detailed cake that I have decorated. I found a pirate ship cake pan that I used as a mold and bought frosting to save some time. I am glad I did because dying all the different colors and piping this cake took close to three hours. All worth the time though, because my little man loved it!
To decorate the cake, I needed to create black, brown, red, yellow, light blue, dark blue, and "sail" colored frosting with a total of 10 different gel dye colors. I went through about twelve 12 inch. piping bags and used #3,5,16, and 21 for my tips. I also used a few techniques that were helpful. The first was to thin out your background color, add a few teaspoons of corn syrup to the already dyed frosting (light blue in this case). A second technique is to cover your finger in cornstartch to smooth out piped frosting. At first you will see the white powder, but it quickly disolves.
Always remember to cover your surface underneath the cake with wax or parchment paper to make sure that you will have a clean slate after decorating!!
Here are the pics:


Wednesday, August 25, 2010
RIBSSBIRRIBSSBIRRIBSSBIR!
Tonight, I mad some ribs. Its not a crazy special recipe. However, if I can impress my dad with my grilling skills, I think its blogworthy!
So, many of you eat ribs, but don't cook them. Therefore, you may not realize that there are several different types of ribs. First you must pick the animal. Do you prefer cow or pig? Personally, I like swine. Once you choose the animal you must also choose the cut. Do you like bigger or smaller ribs? Do you like fattier or leaner ribs? Normally, you will see baby back ribs (most popular and comes in packs of three racks at Costco and BJs) for grilling and spareribs for braising in your food store. However, in recent years country ribs have become popular and may come in the boneless variety (they are basically a thin cut of pork chops. Although this last options seems less labor intensive for eating, you must watch out because the meatier and leaner the rib, the easier it is to dry them out!!!
Now you may ask...how do I cook my ribs so that the meat just falls right off the bone. I don't know the answer to that so you will have to google it. As discussed at the dinner table tonight, the Piccirillo clan likes tender juicy ribs that still hang to the bone...a little sturdy. Therefore, that is the result you will get by following the steps below. Its a slow cook process but TOTALLY worth it.
Ingredients:
Baby Back Ribs (pork)
1 bottle of BBQ sauce of your choice
salt and pepper
1. Set your oven to a low broil. YOU WILL BURN YOUR RIBS IF YOU DO HI BROIL!!!! If you don't have a low broil setting, google an alternative!
2. Place rib racks on a cookie sheet. I actually cut my ribs into pieces with three ribs for easier cooking and serving, but that is completely optional. Season with salt and pepper on both sides. However, you want the meaty side up to start the cooking process.
3. Place in oven and allow the first side to cook for 20 minutes until they look like they are just cooked on the outside. Flip over for 10 minutes. Flip again for an additional 20 minutes. At this point, the ribs should have released some fat but look golden brown on the outside.
4. Turn on your grill and set to lowest temperature setting.
5. Remove from the oven and use a brush to coat the meaty side with lots of BBQ sauce. I used Trader Joe's BBQ sauce tonight but whatever your favorite is or whatever is on sale that week will do!!
6. Once the grill is warmed up, place the ribs meaty side DOWN on the grill and cook for about 15 minutes. Keep an eye on them as grills differ and I don't want you burning dinner!
7. As the ribs are cooking, coat the bone side of the ribs with bbq sauce and then flip. Cook on that side for 5-10 minutes, keeping an eye on them so they don't burn.
8. Repeat steps 6 and 7, re-coating the ribs before each flip.
9. Remove from grill and tent with foil for atleast 10 minutes. And then.....Enjoy!!!!
Cooking times will vary depending on your oven and your grill. The nice thing is that the temps are so low that its hard to mess this up. The worst thing that can happen is that your ribs will taste good but you will just have to gnaw at them a bit!! I'm not a huge teriyaki fan, but im sure you could use that or any other think brushable but sticky sauce you want!!

want s'more?
got a sweet tooth that needs to be satisfied?
Ingredients:
2 graham cracker squares
1 marshmallow
2 squares of Hersheys chocolate
Place one graham square topped with the marshmallow in microwave for 12 seconds (less for large microwave and more for small microwave. You will want more then one, so the first can be your trial!). Remove from microwave, top with chocolate and another graham square, smoosh, and let sit for 30 seconds. Enjoy.
Get saucy and try a double-decker like the future mr and mrs vince did below!!!
 |
| Twice the treat! |
Monday, August 23, 2010
A Healthy Alternative
Although I owe you all a cake post from Gordon's Birthday this weekend, I am waaaaay too tired to upload the pics tonight. Soooooo, I figured I would just give a quick tip for those of you who want to cook healthier but have a picky eater that prevents you from doing so.
Many of you know that using ground turkey or chicken is a great alternative to using ground beef. For those of you who want to eat better, don't mind the difference in taste. However, many of our family members do taste the difference and aren't willing to change their meat preference.
Try this: whenever using an alternative to beef, add a beef bouillon cube diluted with water. An example of when I do this is when making tacos. Turkey tacos can be slightly bland for the true red meat eater. However, add beef bouillon to the "seasoning" after meat is browned and you will have your loved one fooled! If you are watching salt intake, you may get low sodium beef broth and use that instead of water to make the taco sauce for your turkey meat.

Thursday, August 19, 2010
Frying vs. Baking: Can you cut the fat and keep the taste?
There are many different foods that people have grown up eating fried. Some examples are french fries, perogies, and chicken cutlets.
To cut down on the fat, try spraying these items with olive oil cooking spray and bake them instead. A favorite in our house is "oven fries". Using a knife or a mandolin, slice a potato into thin circles or half circles. Spray a cookie sheet with cooking spray and sprinkle with salt and pepper. Arrange potatoes in a single layer, spray tops and season again with pepper (no need for more salt). Bake in a 400 degree oven for about 20-25 minutes, depending on how crispy you like them. They taste like homemade potato chips, but with enough character that they can serve as a side dish with steak or chicken.
Another idea is to prepare chicken cutlets as you would to do the normal italian seasoned fry, but place in an oven instead. You can top them with things like low sodium ham and lowfat swiss to make a cordon bleu. Serve with a side of lowfat honey mustard sauce made by combining light mayo, honey, spicy brown mustard and tarragon (preferably fresh). Delicious and not as guilt ridden as the fried variety!
Perogies and kielbasa with sauerkraut is a meal I grew up eating. These days, this does not have to be the fatty meal is used to be. The new variety of turkey kielbasa made by Hillshire Farms has 5 grams of fat per serving and 90 calories compared to the beef variety that has 16 grams of far and 190 calories per serving. Choosing a perogie variety does not matter much as they all have around the same amount of fat and calories per serving. However, by preparing them in the oven, you get a crunchy outside with a smooth potato inside, rather then a greasy pocket inside and out by frying or sauteing them in butter and onions. Not the healthiest meal all around but if you need your polish fix there are healthier ways to enjoy this traditional meal!
Most of the time, anything fried if full of fat and many like that flavor. But if you are looking to cut some fat and cholesterol out, these few ideas may help!
Cupcake Idea: Mini Pirate Ships
For Gordon's 3rd Bday we having are doing a pirate theme. So I ran with this theme for his school cupcake celebration as well and used pirate flag toothpicks with half of a strawberry and here you have it...mini pirate ships!!
 |
| Strawberry Pirate Ship |
 |
| Simple but cute! |
Appetizer #3: Foccacia for the Soul
How many different types of bruschetta, tapenade, or other antipasto type foods have you eaten where you thought to yourself...this would be even better with a piece of tasty foccacia!?! Never?? Oh well. I have. The other night, while entertaining, my mother and I had made some delicious bruschetta from what was left of the tomato crop after the deers attacked. Now anyone can buy some bread to go with it, but here at the Piccirillo House we like fresh homemade foods. Therefore we did what we like to do. Found a few recipes, combined them and made a delicious but easy to make foccacia that got rave reviews from our guests. It has a few stages but overall, its easier then many recipes I have seen.
Ingredients:
Ingredients:
- 1 1/2 cups bread flour
- 1 1/2 cups unbleached all-purpose flour
- 2 teaspoons salt
- 1 tablespoon white sugar
- 1 (.25 ounce) package instant yeast
- 1 1/3 cups warm water (110 degrees F/45 degrees C)
- 3 tablespoons extra virgin olive oil, divided
- 2 tablespoons chopped fresh rosemary
- 2 tablespoons grated Parmesan cheese
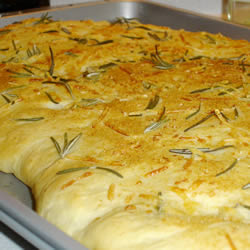 |
| Rosemary Parm Foccacia |
- In a large stoneware bowl, stir together the flours and salt. Make a well in the center of the flour mixture. Sprinkle the sugar and yeast into that well. Carefully pour the water into the well. Let stand until the yeast begins to act, about 5 minutes. Pour 2 tablespoons of the oil into the well. With a wooden spoon stir the mixture in the center of the bowl. Gradually widen the circle of stirring to take in all of the flour at the sides of the well.
- Turn out on a floured surface, and knead just until smooth. Keep the dough soft. Pour 1/2 teaspoon of the oil into a clean bowl. Place the dough in the bowl, turning once to oil the top. Cover. Let rise until doubled, 30 to 45 minutes.
- Punch the dough down. Use 1 teaspoon of the oil to coat a baking sheet, and place the dough on the baking sheet. Gently press the dough out to about 1/2 inch thickness. Pour the remaining 1 1/2 teaspoons oil over the top of the dough. Use the handle end of a wooden spoon to dimple the dough at 1 1/2 inch intervals. Sprinkle with the rosemary and the cheese. Place in a cold oven on the center shelf. Place a flat pan of hot water on the shelf below the bread. Let rise until doubled, 20 to 25 minutes.
- Turn on the oven to 375 degrees F (190 degrees C). Bake the focaccia for 20 to 25 minutes, or until browned on top. Remove from the pan, and cool on a wire rack. Serve warm. Enjoy!
Monday, August 16, 2010
Appetizer #2: Salsa Fresca
Oldie, but a goodie! If I have come to a party of yours in the last 5 years, I have probably made this yummy healthy salsa served with tortilla chips. Its easy and again, never gets left uneaten!
Ingredients:
1 large tomato, diced
1 small yellow onion, diced
1-2 ripe avocados, diced
1 small jalapeno, seeded and minced (optional)
1 can black beans
1 can sliced olives, drained
1 can shoepeg or mexicorn (can use fresh corn if you prefer)
handful of fresh cilanto, chopped
olive oil
lime juice
salt and pepper to taste
Put all chopped and canned ingredients together. Drizzle with a generous amount of olive oil and lime juice. Add salt and pepper to taste. Let sit for at least an hour or so before serving and always serve at room temperature with tortilla chips of any kind, although scoops help people enjoy the chunkiness!
Notes on this dish: don't get too down if you can't use fresh cilantro or any other fresh ingredients. It will still taste okay...what salsa doesn't taste good? However, fresh ingredients do give best results. If you don't like olives or something else, leave them out!! Enjoy!
Dessert #2: Fresh Fruit Salsa
Although the summer's end is fast approaching, fresh produce is still great and this recipe is will make everyone happy from kids to adults. The flexibility of ingredients can accommodate fruit allergies and dietary needs.
Ingredients:
Lots of fruit, any or all of the following: pineapple, peach, strawberries, blueberries, raspberries, blackberries, mango, kiwi, apple, etc.
1/2 jar of seedless raspberry jam (sugar-free if you choose)
1/4-1/2 cup sugar (splenda if you choose)
Cinnamon and sugar pita chips (store bought or homemade)
Dice your fruit into small pieces (you will want to fit a few pieces on a chip). In a large bowl, toss fruit with the sugar. This helps the fruit to release its juices. Stir jam into fruit mixture. Let sit for at least 2-3 hours on the counter before serving, the longer the better. You may want to chill before serving but its personal preference.
I used to always make homemade chips using flour tortillas. However, Stacey's pita chips come in a cinnamon and sugar variety which works well. You can also buy Stacey's naked chips, spray them with cooking spray and sprinkle with cinnamon and sugar. If you prefer to make your own, cut flour tortillas into small triangles. Place them on a cookie sheet, coat lightly with cooking spray, and sprinkle with cinnamon and sugar. Bake at 400 degrees until golden brown about 5-7 minutes. Enjoy!

Appetizer #1: Spanikopita Meatballs
This is a great low fat recipe I got from the food network and made a few changes for myself. I have never had leftovers. You can make a big batch and freeze some for later as well!
Ingredients:

Notes on this dish: I can't tell you how easy and delicious these are. Although I have not done it yet, I am thinking that this recipe would be great to make burgers out of and serve them in a pita!
Ingredients:
- 1 tablespoon extra-virgin olive oil, plus some for liberal drizzling
- 1 small onion, finely chopped
- 4 cloves garlic, chopped, divided
- 1 boxes frozen chopped spinach, defrosted.
- 3/4 cup crumbled feta cheese
- 1 pound ground chicken or turkey
- 1 tablespoons grill seasoning (recommended: McCormick Montreal Seasoning)
- 1 small container low or no fat plain Greek yogurt
- 1/3 seedless cucumber, peeled and chopped
- 1/2 lemon, juiced
- 1 1/2 teaspoons, 1/2 a palm full, cumin
- Salt
Preheat the oven to 400 degrees F.
In a bowl combine onion and 3 cloves of garlic. Squeeze the water out of the spinach until completely dry. Separate the spinach as you add it to garlic and onion. Add feta, chicken and grill seasoning to the bowl and a liberal drizzle of extra-virgin olive oil. Mix the meat with veggies and feta and form mini meatballs (1 1/2-inch). Place the meatballs on a nonstick cookie sheet and bake 10 to 12 minutes until they are golden and juices run clear.
Place yogurt, garlic, cucumber, dill, lemon juice, cumin, coriander and a little salt in food processor and process until smooth. Adjust seasonings and transfer to a serving bowl. Serve meatballs alongside sauce with toothpicks.

Notes on this dish: I can't tell you how easy and delicious these are. Although I have not done it yet, I am thinking that this recipe would be great to make burgers out of and serve them in a pita!
Friday, August 13, 2010
Dinner #3; Chicken and Broccoli over Rice
I love Chinese food. However, we all know that you can only indulge every once in awhile. Therefore, I made up my own beef and broccoli recipe some time ago and decided to do Chicken version tonight.
Ingredients:
Chicken Breast
1 head of broccoli
1 cup baby carrots, quartered lengthwise
1 small onion diced
2 cups + 2 cups chicken broth
2 tablespoons + 2 tablespoons soy sauce
2 tablespoons corn starch
1 tablespoon + 1 tablespoon sugar (or sweetener of choice)
1 teaspoon + 1 teaspoon kosher salt
1/2 teaspoon fresh ground pepper
2 tablespoons toasted sesame seeds
Rice of choice
1 tablespoon oil of choice
At least 30 minutes ahead of time, cut chicken breast into strips. I used pre-cut tenders because they were on sale :). Pound them out so they are about 1/4 inch thick. Place chicken in a big ziplock or bowl with 2 tablespoons soy sauce, 1 teaspoon salt, and 1 tablespoon sugar. Let sit in fridge for 30 minutes or until ready to cook.

About 30 minutes before you want to eat.....
As usual, I cooked my rice in a rice cooker using about 2 cups chicken broth for my liquid. Cook rice as you do, but use the chicken broth....it makes a difference.
In a large skillet, heat oil. Saute marinated chicken until cooked through. Make a well in the middle of the pan and put onions in. Cook until translucent using the juice from the chicken. In a small bowl or measuring cup, combine corn starch, soy sauce, and about 1/2 cup of chicken broth using a whisk. Once mixed, add remaining 1 1/2 cups of broth, salt, sugar and pepper. Pour over chicken and continuously stir so that the corn starch does not clump. Your sauce will thicken very quickly. As soon as it is to your desired consistency, put broccoli and carrots in pan. Stir to coat veggies, cover, and simmer on lowest heat until broccoli is cooked to your liking. Right before serving, add toasted sesame seeds to pan. Serve over rice.
 | |
| Ingredients |
 |
| Thickened sauce |
 |
| Plated dish in bad lighting! |
Notes on the dish:
In the ingredients, you may have noticed that I split measurements into two for example the soy sauce is 2 T + 2 T. The reason for this is that you need it at two different points, first to marinate and then for the sauce.
The beef variation is prepared the same way, but using beef (I get the think sliced sandwich steaks and slice into strips) and beef broth. I really suggest you invest in the rice cooker. It just makes life so much easier. I tend to use low-sodium soy sauce. If you don't, then I suggest omitting the salt from the recipe. If you would rather not use regular sugar, you can substitute your sweetener of choice (splenda (yuck), agave syrup, etc). The reason I add the sweet is to make it taste less like a plain stir fry and more like a chicken broccoli dish from House of Chao in New Haven or other traditional chinese restaurant. Tip: when toasting your sesame seeds, they will go from not toasted to toasted too much VERY quickly, as will most seeds or nuts when dry toasting in a pan. Don't take your eyes off of them or you will waste a few batches (take it from experience!). Enjoy!
Cakes and Treats
So you may be wondering why I titled my blog cooking and cakes if I have only talked about cooking.
I have decorated a few cakes and hope to really improve and increase my cake decorating. Many of you have seen these pics but for those who haven't, I figured I would share. I hope to one day take a class in using fondant to make more elegant cakes...all for fun :)
I also make cute favors for parties that are very easy for you to do yourself! Make or buy treats, and then personalize a goodie bag with scrapbook paper and ribbon!
I have decorated a few cakes and hope to really improve and increase my cake decorating. Many of you have seen these pics but for those who haven't, I figured I would share. I hope to one day take a class in using fondant to make more elegant cakes...all for fun :)
 |
| John Deere |
 |
| Yankee cake 1 |
 |
| Plain BDay |
 |
| Decorating... |
 |
| Finished Elmo - Gordon Bday #2 |
 |
| Cake for a Co-Worker |
 |
| Steelers Cake |
 |
| Never worked with fondant and wanted it to look tie-dyish! |
I also make cute favors for parties that are very easy for you to do yourself! Make or buy treats, and then personalize a goodie bag with scrapbook paper and ribbon!
 |
| Caramel Chocolate Popcorn |
 |
| Finished Product! |
Thursday, August 12, 2010
Dessert #1: Nutella makes everything better!
I cannot take credit for coming up with this (Thanks KM and HG). However, I will take credit for sharing it with you!!
Berry Crunchy Goodness
Ingredients:
Quaker Oats Chocolate Crunch Rice Cake
Nutella
Whipped Cream
Berries (raspberries or sliced strawberries)
Chocolate Chips
Layer Rice cake with toppings in that order and enjoy.
Notes: None...just make it.
Berry Crunchy Goodness
Ingredients:
Quaker Oats Chocolate Crunch Rice Cake
Nutella
Whipped Cream
Berries (raspberries or sliced strawberries)
Chocolate Chips
Layer Rice cake with toppings in that order and enjoy.
 | |
| Its a rice cake so its healthy :) |
Side dish #1: Fresh Peas
I never cooked with fresh peas until recently. Tonight I made a side and it was tasty. Even Gordie ate it!!
Ingredients:
Fresh Peas, podded
diced red onion
Toasted pine nuts
Asiago cheese
oil or butter
salt and pepper
Steam fresh peas for 3 minutes until tender but not shriveled, like mine :( Remove from pan. Empty water and then use pan to heat oil or melt butter (I used soy butter). Sweat onions until translucent. In a side pan, toast pine nuts until light golden brown. DO NOT OVER TOAST! Nothing is good over-toasted, think about it!
Once onions are cooked, add peas and pine nuts, then season with salt and pepper. Once you have plated your peas, add a sprinkle of asiago cheese.
Notes on this dish: Make sure not to overcook peas or pine nuts or it will ruin the dish! Also, a friend of mine introduced me to adding pesto to peas and it was delish!! Try it!
Ingredients:
Fresh Peas, podded
diced red onion
Toasted pine nuts
Asiago cheese
oil or butter
salt and pepper
Steam fresh peas for 3 minutes until tender but not shriveled, like mine :( Remove from pan. Empty water and then use pan to heat oil or melt butter (I used soy butter). Sweat onions until translucent. In a side pan, toast pine nuts until light golden brown. DO NOT OVER TOAST! Nothing is good over-toasted, think about it!
Once onions are cooked, add peas and pine nuts, then season with salt and pepper. Once you have plated your peas, add a sprinkle of asiago cheese.
 | |
| A side dish that your kids may eat! |
Dinner #2: Coconut Fish with coconut mango rice
This is a quick dinner. Easy to make for one or ten! Somewhat of a unique flavor, but if you like fish cooked like they do in other countries, you will like this.
Ingredients:
Any white fish from snapper (hard to find) to tilapia (easy to get)
1-2 cans coconut milk
Fresh tomatoes sliced
1 Sliced lemon
1 small Sliced onion (red or white)
Bay leaves
2 chicken boullion cubes, crushed
1 julienned mango
Jasmine white rice
Olive oil
Salt and pepper
Preheat oven at 375 degrees.
Cook your rice how you normally would, but substitute 1/2 of the water for coconut milk . I used a rice cooker, which is so easy and can be purchased for about ten bucks at walmart. DEF worth the investment if you are a rice eater!
In a pyrex or ceramic baking pan, drizzle some olive oil and place fish in pan. Flip it over once so it gets a coat of the oil. Season with salt and pepper. Place one layer each of tomato, onion, and lemon in that order. In a bowl, crush boullion cubes and then add remainder of coconut milk and a few bay leaves and mix. Pour over fish and cover with foil. Cook for about 10-15 minutes depending on thickness of fish. Fish is done when you can flake fish apart with a fork.
Serve by putting a scoop of rice on a plate, add a piece of fish with layers intact and garnish with fresh mango. Enjoy!
Notes on this dish: This is best with snapper and does not work great with cod because it does not soak in the flavor. You will have to adjust your cooking time according to the fish you choose. Also, if you know how to make sticky rice and have the time, it would compliment the dish. If you are not familiar with coconut milk, you can find it in the Goya section or the Thai section of your food store. It comes in a lowfat version as well.
Ingredients:
Any white fish from snapper (hard to find) to tilapia (easy to get)
1-2 cans coconut milk
Fresh tomatoes sliced
1 Sliced lemon
1 small Sliced onion (red or white)
Bay leaves
2 chicken boullion cubes, crushed
1 julienned mango
Jasmine white rice
Olive oil
Salt and pepper
Preheat oven at 375 degrees.
Cook your rice how you normally would, but substitute 1/2 of the water for coconut milk . I used a rice cooker, which is so easy and can be purchased for about ten bucks at walmart. DEF worth the investment if you are a rice eater!
In a pyrex or ceramic baking pan, drizzle some olive oil and place fish in pan. Flip it over once so it gets a coat of the oil. Season with salt and pepper. Place one layer each of tomato, onion, and lemon in that order. In a bowl, crush boullion cubes and then add remainder of coconut milk and a few bay leaves and mix. Pour over fish and cover with foil. Cook for about 10-15 minutes depending on thickness of fish. Fish is done when you can flake fish apart with a fork.
Serve by putting a scoop of rice on a plate, add a piece of fish with layers intact and garnish with fresh mango. Enjoy!
 |
| Coconut Fish |
Dinner #1: Stuffed Eight Ball Squash
I am starting my blog with a meal from a few nights ago because it was so tasty! As you will see from the pictures, I cooked for a few extra people. But that's part of the reason I am doing this, to get used to cutting down how much I make. So here you go!
 Eight Ball Squash. They are weird. Round like a pumpkin, but green like zucchini. I have never seen them in the store, but my parents grow them. You could make this recipe using regular zucchini, but you won't have as cute of a serving dish!
Ingredients:
Eight ball or regular zucchini (1 squash = 2 people),
1 package chicken sausage, decased and browned (I used stew leonards)
1/2 cup toasted pine nuts
1 cup diced fresh tomato
1/4 cup diced red onion
4 cloves minced fresh garlic
A handful of fresh basil.
2 cups cooked orzo
Parm Reggiano cheese (optional)
Preheat oven to 375 degrees.
Scoop out pulp from squash, diced it and put to the side. You have to parboil the squash for about 4 minutes in boiling salt water then let sit while you make the stuffing. Brown sausage in a large skillet. Remove and drain. Follow the directions on a box of orzo to cook about 2 cups of pasta til al dente. In a tablespoon of olive oil, sweat out the onions and garlic until translucent. Add diced squash pulp. Let saute until squash is cooked through. Add sausage and pine nuts. Cook or about 2 minutes. Remove from heat. Add fresh tomato, basil and cook orzo. Toss til mixed through and then add the parm cheese. Stuff into squash halves and put onto a cookie sheet or into a roasting pan. Bake in the oven for 20-40 minutes until the squash is fork tender.
My notes about this dish:
I did stuffed 3 eight ball squash so you will have to adjust ingredients if you are not cooking for an army. Also, if you do all your prep ahead of time like cooking the orzo, toasting the pine nuts and cutting the other ingredients, it makes this this dish easier to cook. The results were fabulous and I wrote this recipe with some changes that I thought would help. You will have adjust cooking time in oven depending on size of your squash. Enjoy and let me know if you have any questions!
 |
| Prep the ingredients. |
 |
| Saute the squash pulp with onion, garlic and pre-cooked sausage. |
 | |
| Ready for the oven! |
Post #1
So. I am recently divorced, love to cook, and done with another degree so I have lots of free time. Often when I cook a meal and post a pic or have someone taste my food, they want the recipe. While cooking tonight, I came up with the idea to blog what I cook. I will include recipes, pictures, and my opinion of the dish with a few suggestions on changes I would make. If anything, this will be a way for me to reflect on my cooking as I get used to cooking for 1 adult/1 child :) So thanks in advance for any comments and/or suggestions you may have for me! Otherwise, Enjoy!!
Subscribe to:
Posts (Atom)